- Click here to learn how to access Whole Building data coverages
- Click here to learn how to access Space-based data coverages
Add, Edit, Delete Entries
To edit data coverage values, users must first access the appropriate Whole Building or Space-based data coverage sidebar. After opening the data coverage sidebar, follow the instructions below:To add a new entry
- Click on Add New button at the top of the sidebar
- Enter the date from which the new data coverage values will apply
The sidebar will pre-populate with any data coverage values associated with the most recent date before the date entered
- Fill out the updated data coverage values to activate the Save button
- Scroll down for guidance for filling out values
- Click Save at the bottom
To edit an entry
- Use the top dropdown menu to select the date associated with the data coverage values that you would like to edit
- Fill out the updated data coverage values to activate the Save button
- Scroll down for guidance for filling out values
- Click Save at the bottom
To delete an entry
- Use the top dropdown menu to select the date associated with the data coverage values that you would like to delete
- Click the Delete button at the bottom
Entering Data Coverage Values
The data coverage table includes cells for each combination of utility and space type. The following steps should be followed to enter values for all data coverages.1
Select Data Coverage Date (or Add New)
Use the top dropdown menu to select the date associated with the data coverage values that you would like to edit.
Data coverage uses a current as of methodology, meaning that values will continue to apply indefinitely or until the date of the subsequent entry.
2
Review Assigned Meters
Each row in the table displays the number of meters assigned to the utility and space type combination. Users should confirm that all meters are properly assigned.
3
Check the 'Is Serviced' Boxes
The first checkbox in each row should be checked if the space is serviced by the utility type.
- If the space type is serviced by the utility type and meter data is available, then there should be assigned meters (Step 2) and the box should be checked.
- If the space type is serviced by the utility type but no meter data is available, the box should still be checked and the Actual Area Covered should be set to 0.
- If the space type is NOT serviced by the utility type, the box should be not checked. In this case, any values are always ignored for the space and utility type combination.
When entering data coverage values for the first time, all boxes are checked by default. Users should immediately go through and uncheck all boxes as needed.
4
Review Gross Floor Area Values
The Gross Floor Area value in each row represents the total floor area of the space type.
- Whole Building Data Coverage → Equal to the property’s Gross Floor Area.
- Space-based Data Coverage → Equal to the floor areas entered for each space type in the property. These values can be edited by navigating to Property → Spaces and clicking the Floor Areas button at the top-right.
5
Enter Data Coverage Values
For all rows with boxes checked, the Max Area Covered and Actual Area Covered values must be entered.
6
Save and Review Validation Warnings
After saving, Abisko will automatically validate data coverage values. Users can use the warnings to review and correct any improperly entered values.
Data Coverage Validation
Abisko displays row-level data validation warnings within the data coverage table to help users enter compliant values.Validation Rules
The following validations are automatically executed after any changes are saved:- If Assigned Meters count > 0 (i.e. any meters are assigned to a space type), then the box must be checked in the row, as the space is serviced by the utility type
- If a space is serviced by a utility type (i.e. box is checked in the row):
- If assigned meter count > 0: Actual Area Covered must have a value greater than 0
- If assigned meter count = 0: Actual Area Covered must equal 0
- Actual Area Covered must always be less than Max Area Covered
- Max Area Covered must always be less than Gross Floor Area
- If a space type is defined, then at least one utility type must have a Max Area Covered value greater than 0
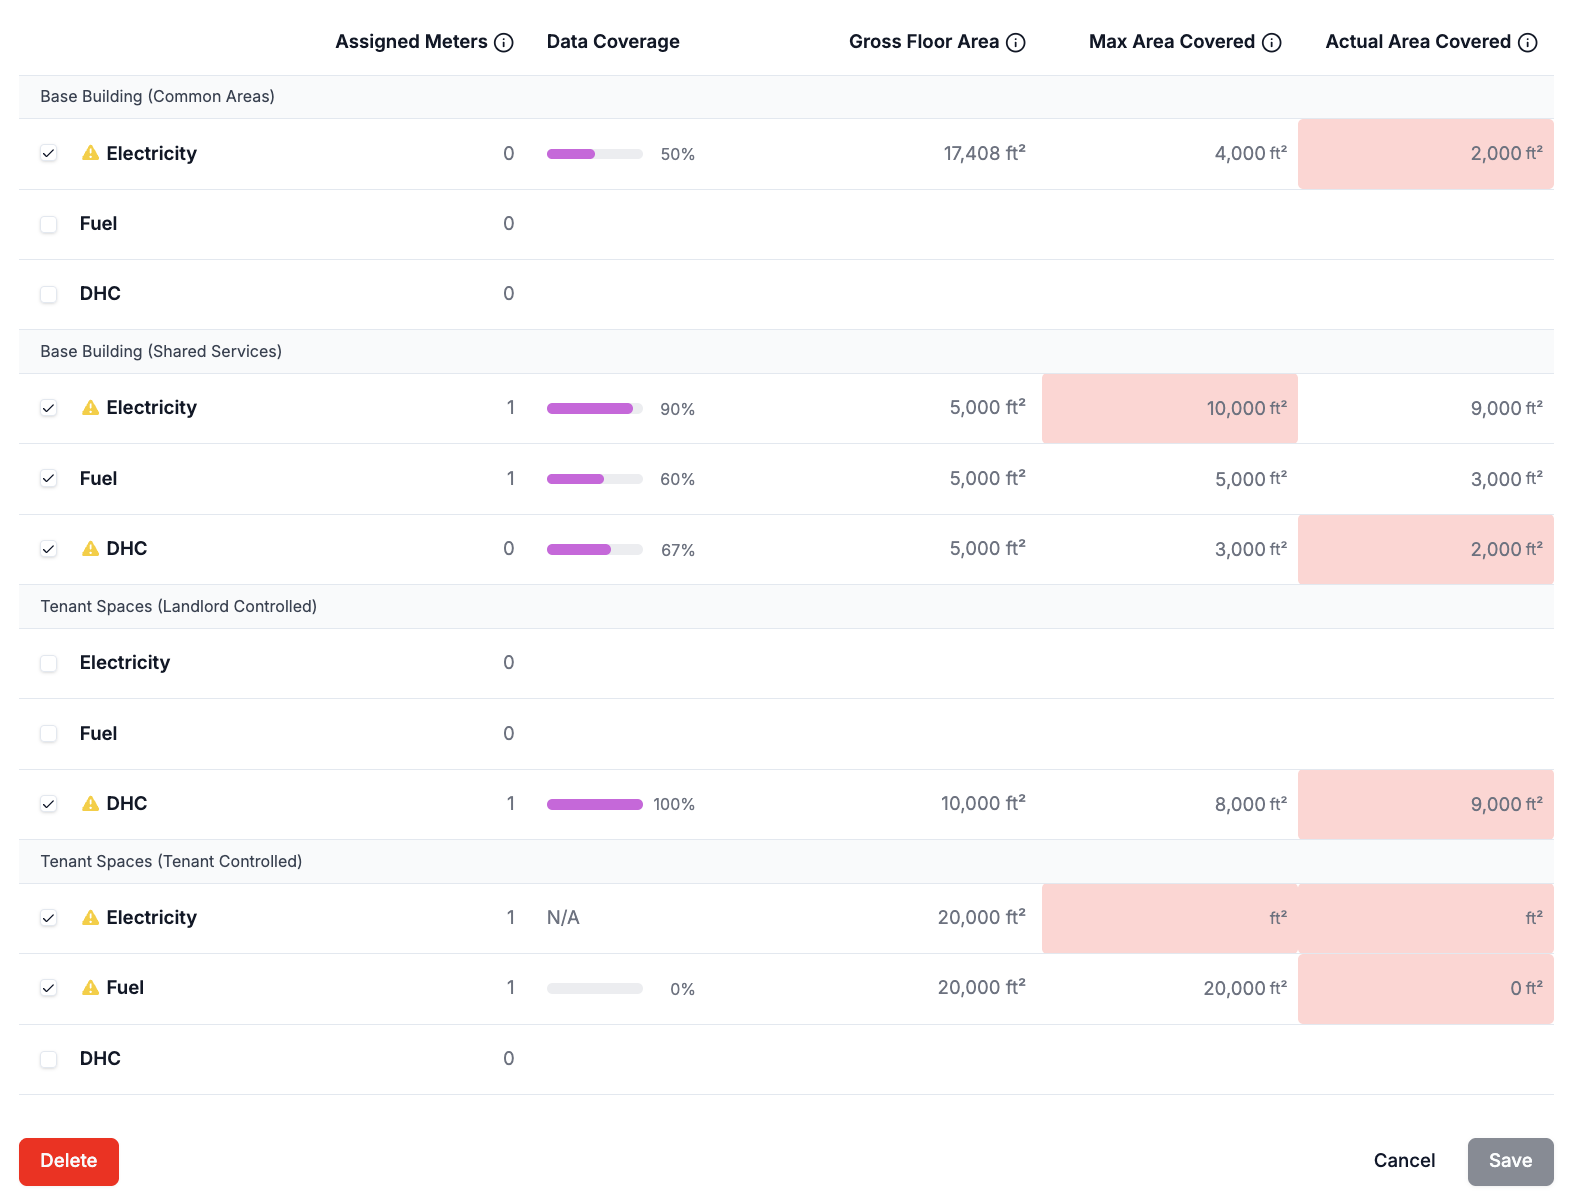
- Row 1: There are no electricity meters assigned to Base Building (Common Areas) and therefore the box should be not checked and no values should be entered.
- Row 4: Max Area Covered cannot be greater than Gross Floor Area.
- Row 6: There are no DHC meters assigned to Base Building (Shared Services) and therefore the box should be not checked and no values should be entered.
- Row 9: Max Area Covered cannot be greater than Actual Area Covered.
- Row 10: No values have been entered for Max Area Covered and Actual Area Covered.
- Row 11: Actual Area Covered cannot be 0 if there are active meters assigned to the space.